Showing posts with label Mixed Media. Show all posts

Tuesday, 7 June 2022

Time for my dreams.....

So we're sponsoring 613 Avenue Create this month, as well as that I'm honoured to be a guest designer with them and a Master Rocker this time :)

Their optional twist this time is Let It All Hang Out.  It's been a long long long long time since I did any mixed media so I though this the perfect opportunity.  

I got a couple of wooden door hangers from Hobbycraft a few weeks ago ready for this project.

I've used Morpheus the little sleeping dragon for my inspiration, you can find him in the shop here.  He's been coloured with Copics and them fussy cut.  Then I had a bit of a block after colouring him.  I was going to make my own cloudy background with some modelling past but our holiday got a bit in the way.  A crazy week at home, we were supposed to be chilling and well that didn't happen.  I've gone back to work this week for a rest haha!


So I grabbed a bit of time towards the end of last week and dug out some stencils.  I found some lovely floral ones from Tim Holtz and some dots.  I also used the ones with the scrip writing on (can't remember who that one is by without doing a lot of digging).

One I'd done the modelling paste bit and dried it I splashed some black gesso on and dried it.
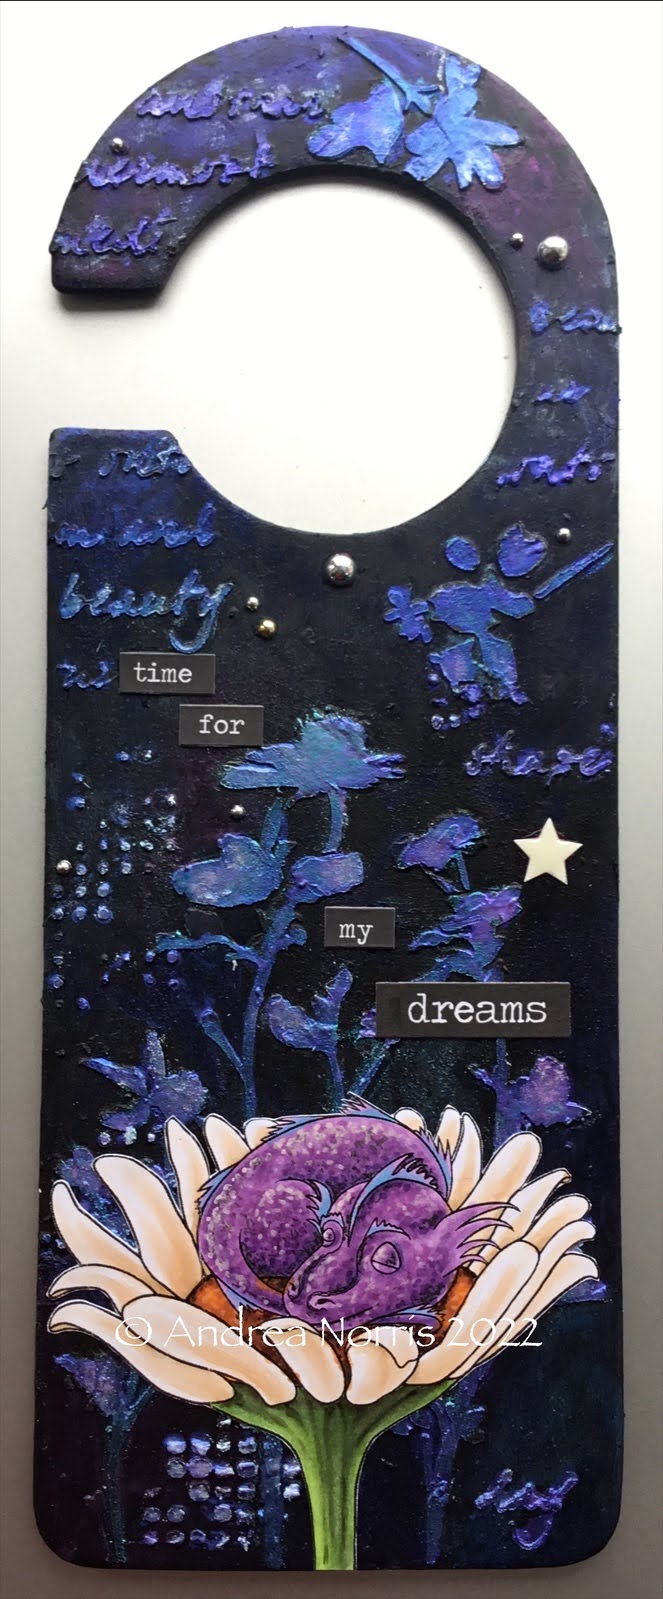

Once dried I started to highlight the raised parts with Metallic gilding polish from Creative Expressions, some Distress Spray Stains from Tim Holtz and DecoArt Interference Fluid Acrylics.  Out with the heat gun again! 


Finally I added Morpheus, some silver gems, a white star and a sentiment "Time for my Dreams"

Really enjoyed my crafty time, just wish it wasn't so rushed!  Bloomin holidays :D

Andrea x

I'd like to enter this hanger into the following challenges
The Fairy and the Unicorn - June Challenge
LeAnns World 101 - Anything Goes
Crafty Catz - Anything Goes
CCC Digi Creations - Eileen's Anything Goes
Critter Crazy - Challenge 63
Crafty Animals - Challenge 62
Crafts Galore Encore - Anything Goes
Mix It Up - Challenge 59
A Perfect Time to Craft - June
Classic Design Challenge 6


Friday, 14 August 2020

Scrapping4Fun GDT


I'm honoured today to be joining Scrapping4Fun as their guest designer.  Their theme is Anything Goes and they're sponsored by The Paper Shelter - how awesome!

I chose this time to create something mixed media.  I'd started this a while ago and thought it would be nice to get it finished,  It looks like a tag but is actually a door hanger made from a wooden shape I bought in Hobbycraft ages ago.


Here you can actually see it hanging up in our living room.  You can's quite see the texture properly here so I've taken a couple of angled shots as well.


First I covered the wood with white gesso.  Then I used a couple of stencils with some modelling paste for the shapes and writing in the background.

Some more gesso and then some water colour powders and a spritzer came next to move the paint around.  I've given it a matt look, first time I've tired these.  Ovre this was dry I added some guilding polish over the shapes.


The trees at the bottom were made from Dusty Attic chipboard sprinkled with embossing enamel which I then heated with a heat gun.


The bird has been in my stash for ages.  The sentiment "Live the Moment" is made up from Tim Holtz stickers.  Finally a little ribbon through the top to make the hanger.

Thank you to Rachelle and the team for having me this time
Andrea x

I'd like to enter this creation into the following challenges
Creative Artiste - Challenge 63
Not Just Cards - August
More Mixed Media - Anything Goes
We Love to Create Mixed Media Challenge 8
Arty Divas - Anything Goes
Classic Design Challenge 8
Crafter's Castle - Anything Goes
Lets Craft and Create - Anything Goes


Friday, 1 May 2020

Pearl Wedding


I was asked to create a very special gift, a pearl wedding anniversary album and card for a neighbour.
So this is the result, I hope you like it she does :)


First of all the design paper is from Lemoncraft, they have some large scrapbook sheets which were perfect for this project,

The letters you can see hre were cut out of while card with Sizzix letters.  I then painted them with some acrylic paint.  When they were dry I added them to the album doing a dry fit to make sure everything worked together.


There is a border around the album which is a Dusty Attic one.  I painted the flowers on it with acrylic paint and added some pearl gems to the centres.


At the top left of the album you can see a close up of my floral section.  Added to this is some ribbon donated by my neighbour, some more pearls, sequins, tiny silver dragonfly charms and sparkly dots.


The only thing you could see on the previous pictures were the resin hearts I added.  Here's the full album finished.

So the next thing I did was to work on a card to match the album.


I've used a Dusty Attic frame which is out of the same pack, just smaller and perfect for the card.  The ribbon here is smaller (shhh it's actual recycled from some clothing, you know those annoying ribbon this that are supposed to hold your clothes on a hanger)

An extra element on the card are some tiny wooden hearts.


The sentiment was printed directly onto the design paper.

Thanks for popping by and thank you for Arty Divas for having me as a guest designer this time
Andrea x

I'd like to enter this album into the following challenges
A Place to Start - Use Ribbons and / or Bows
Ally's Angels - Anything Goes
Not Just Cards - Anything Goes
Crafty Card Makers - Anything but a Card
The Creative Crafters - Anything Goes
Southern Girls - Anything Goes


Wednesday, 21 August 2019

Quick, messy n fun!

We were a little short on inspiration this month for our Facebook Challenge at SheepSki Designs.  So I decide to knock up a quick messy card using a new image called Flowering Cherry.


The image was coloured in pastel peaches and greens with Copics.  I've not gone for the full detail, but just added a little texture to the flowers.  Once I'd done this I fussy cut the image our.

Inspired by my friend Shylaa who used to be on my DT I decided to do a mixed media style card.

On a blank piece of card I used a Tim Holtzz stencil and modelling paste.  I heat dried this, splashed some DecoArt acrylic shimmer paint on.  Drying this again with a heat gun i sprinkled some embossing enamel on top and heated again.  All about the heating this card LOL!!


When it was all dry I distressed the edges, added the image and a Make It Crafty chippy sentiment coloured with Black Copic.  The sequins once I'd glued them on I also heated.  I was trying to dry the card so I could take a photo.  During the process the sequins melted slightly and the surface changed to matt - I really loved them and think I'll try this on purpose again!

Anyway - here a bit of messy quick inspiration in a mixed media style ;)
Andrea x

I'd like to enter this card into the following challenges
Crafty Gals Corner - Emboss It
The Creative Crafters - Anything Goes
Crafty Creations - Anything Goes
QKR Stampede - Anything Goes
Pammies Inky Pinkies - Anything Goes
Through The Crafty Room Door - Anything Goes
Try It On Tuesday's - In my Garden There is....
Penny's Challenge - Anything Goes


Thursday, 2 May 2019

Mini Vintage Style Canvas


I've made this canvas in mind of our current challenge on the SheepSki Designs Challenge blog where the theme is FLOWER POWER!

The image has been coloured with Copics then fussy cut to add to the canvas, which took AGES!
The canvas measures 18 x 13cm just to give you an indication of size.


I've used a stencil from Tim Holtz and some modelling paste to create the background.  Once the background was dry I painted it with white gesso and acrylics.

Again I waited for this to dry, then highlighted the stencil with Metallic Gilding Polish in Pearl Lustre to add some shine.


At the lefthand side I've added a strip of white lace.  I then added the fussy cut rose image.  At this point I used a DecoArt Shimmer Mister to add the shimmering spots you can see across the canvas.

On top of this at the left some Dusty Attic honeycomb chipboard.  Next I added on the resin butterflies and finally the sentiment created with Idea-Ology Big Chat stickers.

I loved creating this I just wish I had much more me time to be able to do things like this for gifts!

Thanks for popping by for a look today
Andrea x

I'd like to enter this canvas into the following challenges
A Inky Mess - Challenge 30
More Mixed Media - April
Not Just Cards - April
Creative Craft Cottage - No Patterned Paper
World Wide Open Design Team - Challenge 4
Try It On Tuesdays - Things with Wings
Pearly Sparkles - Traci's Recipe - Pink / Pearl / Sparkles
The Crafter's Cafe - Make Your Own Background
Digi Doodle Studios - Sparkle / Shimmer


Sunday, 13 January 2019

Forever Thoughtful

I found last year I was a little pressured and was chasing my tail all the time to keep up.  With two of the blog challenges closing I DT'd for and another going down to fortnightly instead of weekly I now have a little time on my hands to be able to play and be creative.  Unfortunately I got a bit carried away and forgot to take pictures along the way, but I've got lots of angled shots and close ups.


My mother in law gave me some money for Christmas so I headed on down to Hobbycraft to see what I could find.  This was originally a wooden heart plaque, which I've altered with LOTS of "stuff" :)


Amongst the goodies I bought were some Metallic Gilding Polishes, the one you can see on the cogs above is the Ocean Teal colour from Creative Expressions.  The cogs of course are from Tim Holtz, as are the words "Forever Thoughtful".


Here a closer angled photo of the flower section, most of there were bought from The Ribbon Girl.


This one is a little further away.  You can see I painted the whole thing with black gesso, this is the first time I used it, messy was not the word LOL!!


Once dried I used a Dot Fade stencil from Tim Holtz to add a bit of texture.


In the gaps between the dots I've added some Golden Crackle Paste to add a second texture.  I then added more black gesso (note to self get black modelling paste!).  It got a bit more messy after than using some shimmer mister acrylics from DecoArt in two shades, I then pained on some DecoArt interference media in blue, this gave the purplish look.


Once all this had dried I added some Zing Embossing power to add a bit of sparkle to some areas (also in blue) you can see a section of this at the top right of the heart.  On top of this I added the cogs which I gilded before adding the flowers.


ModPodge was my best friend adding all the embellies to this.


I chose to do this in my favourite colour combination of blue and purple, normally I do this on cards so I was a bit dubious on how it would look.  It came out so much better than I hoped, I love the colours and sparkles.  Not sure if I will be giving this one away.  Here's the finished thing :)

Thanks for popping by to take a look
Andrea x

I'd like to enter this heart into the following challenges
Splashy Mix Challenges - Anything Goes
More Mixed Media - Anything Goes optional blue
The Sisterhood of Crafters - Make It Sparkle
Through The Purple Haze - Favourite Colour
Through The Craft Room Door - Anything Goes
Not Just Cards - January
613 Avenue Create - Anything Goes
Crafty Creations - Anything Goes
Creative Moments - Anything Goes

Monday, 15 October 2018

Earth n Art

I'm joining Do Al(l) Kreatives today as a guest designer for their mid month inspiration on creating your own background.  I'm also sponsoring their current challenge.


The image has been coloured with Copics to match the background I created.  I've then fussy cut her to add to the canvas.

The background was created using stencils, modelling paste and crackle paste the create the texture.  I then added all the flowers before painting it all white with gesso.  Once I'd done this I then started to use two coloured spray paints from DecoArt in blue and deep pink and a water mister.

Once dried I started to paint the highlights onto the flowers and used some gold to highlight some of the words.  The resin butterfly was added after this and I've used the same coloured paints to add a little colour to it.

Once the canvas was dry I added the fussy cut image and the sentiment from Scrapiniec which had also been coloured with Copics.

Hope you like my inspiration for today.

Thanks for taking the time to pop by today
Andrea x

I'd like to enter this canvas into the following challenges
QKR Stampede - Anything Goes
Not Just Cards - October Anything Goes
Time Out - Colourful
Penny's Challenge - Anything Goes
Creative Moments - Anything Goes
A Inky Mess - Anything Goes
Creative Artiste - Challenge 43
More Mixed Media - Anything Goes
We Love 2 Create - Anything Goes / Mixed Media
Lil Patch of Crafty Friends - Anything Goes


Friday, 4 May 2018

Beautiful blues


Sooooo what have I done :)
I've used papers from Lemon Craft and Maja Design.  All except the brick work have been distressed with a Tonic Solutions die.  I've layered and interlocked the different sections.
On top of this are a couple of wood chip elements from Scrapiniec.  Inside of these are some Tim Holtz stockers creating the sentiment.  The card is very tactile and 3-d so I've taken another angle so you can see some of this,

In my flower arrangements there is a piece of craft gauze, some while leaves, daisies, roses and cherry blossoms in different shades of blues and some while heather.  There's also a little cream twine.

There are some glitter dots, some rhine stones and a few silver dragonfly beads.

Hope you like my inspiration today, thanks for taking a look
Andrea x

I'd like to enter this card into the following challenges
Create and Makes - Anything Goes
Inspiration Destination - Anything Goes
Scrapping4Fun - Anything Goes
Simply Papercraft - Anything Goes
Creatalicious - Anything Goes
Artistic Inspirations - Anything Goes
Through The Craft Room Door - Anything Goes
Love to Scrap - Anything Goes
Worldwide Open Design Team - Challenge 4
A Perfect Time to Craft - Anything Goes

Friday, 5 May 2017

Little Pink Flutterby

I have the honour of being a Guest Designer at Let's Craft and Create this month.  Their theme is to create your own background.

I had a little thing and then thought what an opportunity, I haven't created a mixed media canvas for a while.

Here's a little pic of the finished project, but I'll also show you some pictures along the way

First of all I took a blank 8" x 8" canvas and slapped on a layer of gesso (the canvas was a kind of browny Kraft colour when I started).

On top of this a added some modelling paste and used some stencils to add in some details.  The stencils I used were
Tim Holtz - Crackle, Bubble and Bricked
The Crafter's Wrokshop Mini Template for the text


Close up of a text & crackle section

Close up of a wall & bubble section

Once this was dried I coated it with another layer of gesso.

I then printed a coloured my Flutterby image which you can find in my Etsy shop here.  You can get this and any of my images with 10% off by quoting SKIANDREA10 at checkout.  I've coloured it with Copic and polychromos pencils.  Once coloured I fussy cut it ready to mount onto the finished canvas.

I got so carried away I forgot to take pictures along the way but I can tell you what I've used yo create this.  Some blue copic and a blender which I now need to clean LOL!!

The pinks are created using a DecoArt Magenta Mister and a mister filled with water (the ink allowed to drip down the page)

On the bricks I've added sections to the brick of DecoArt Sand Texture Paste and DecoArt Fluid Acrylic Inteference in Blue to add interest.

Here's a close up of the crackle dection to which I've added lashings of DecoArt crackle paste.  On the bubble stencil you can see I've added some Golden glass bead gel

Here's a close of of the section with the Interference Paint

Once the first layer had dried I added some more of the Magenta Mister and allowed it to drip down the canvas.

The window you can see here is part of a resin element from a Prima Shabby Chic set.  Under the window I've also added some Craft gauze for a bit of interest. 

Here's a close up of the magenta mister dripped down the canvas.

And the section where the window is in close up

On top of this I've added some flowers and leaves from Wild Orchid Crafts and Noor Design (cherry blossom, magnolias, orchids and gypsophila.  This again is a close up of the finished canvas for you.

I've then taken a few close up shots so you can see more of the detail.

Heres the cherry blossoms and Flutterby.

The magnolias and gypsophila.

The window section.

Then a few angels photos so you can see the dimension created by the flowers.


Finally I had a yay! moment when I discovered that the canvas would actually fit into a deep picture frame so i could protect it.


Hope you love my inspiration for creating you own background.

If you want to ask me any questions about this you can find my in my Facebook group SheepSki Designs - click here or you can email me at sheepskidesigns@gmail.com

Andrea x

(PS yes I was covered with pink ink!!)

I'd like to enter tis creation not the following challenges
Creative Sketchy Girls - Butterflies and  / or Flowers
PINSpirational - Challenge 189
A Inky Mess - Challenge 10
Inky Chics - Butterflies
Frilly & Funky - Put Your Inking Cap On
The Sisterhood of Crafters - The Letter B - Butterfly, Blue, Background
Addicted to Stamps - Flowers & Butterflies
Glitter 'N' Sparkle - Flower Power
Pearly Sparkles - Things with Wings
Through the Craft Room Door - Anything Goes